Introduction to Web and HTML

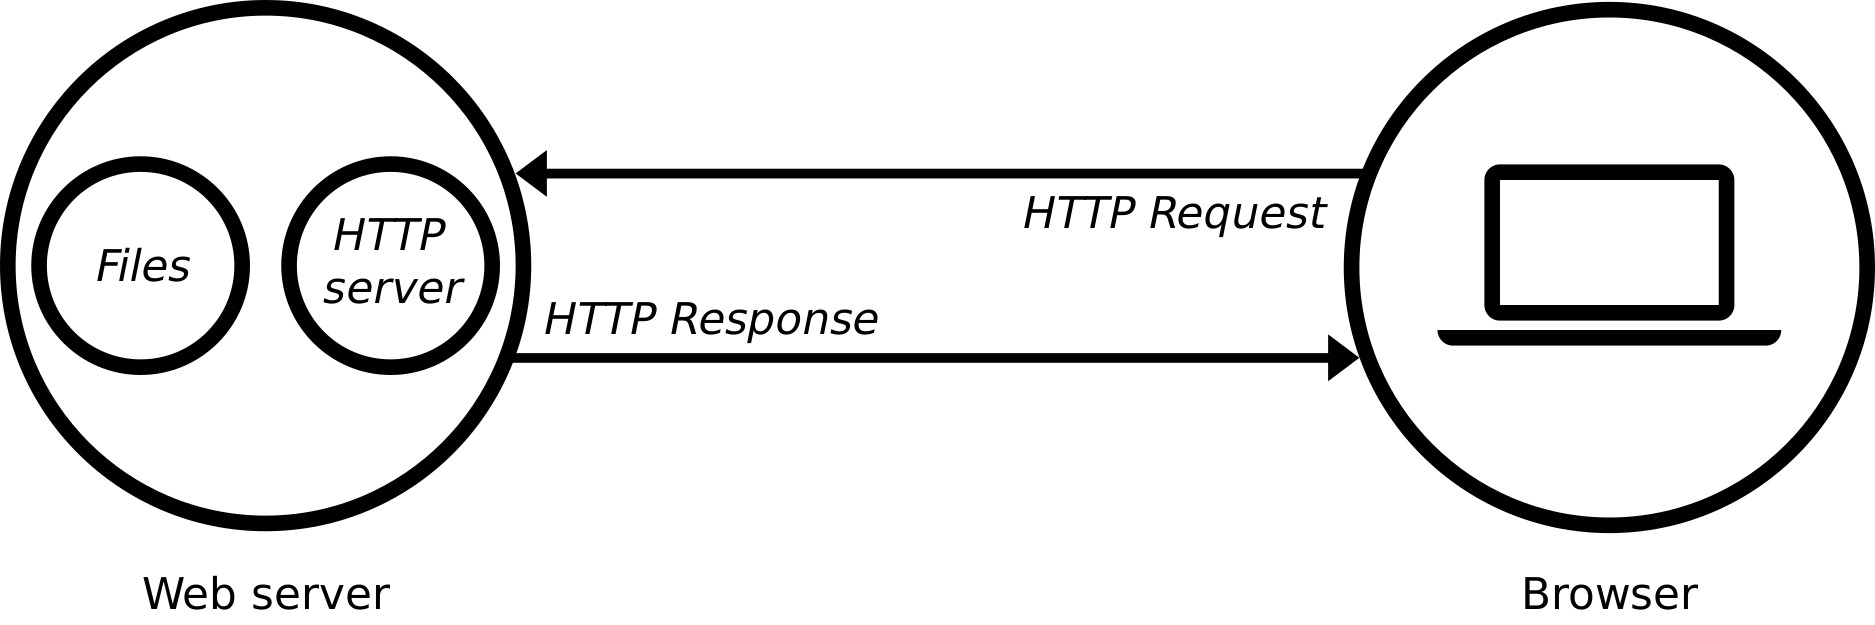
What is a web server?
Is it software? Is it hardware? Or is it both? The web server can be referred to as hardware or software.
For the hardware side, think of it as a system that stores web server software and all your website component files(for example, HTML documents, images, CSS stylesheets, and JavaScript files).
And for the software side, a web server includes several parts that control how web users access hosted files. At the very basic level, whenever the browser needs a file that is hosted on a web server, it tries to connect to the correct web server(hardware) via HTTP. The HTTP server(software) accepts the request and returns the requested document to the browser, also through HTTP.
Apache
Apache is an open-source web server. Apache is the web server that processes requests and serves web assets(website address, domain name, URLs, etc.) and content via HTTP. It functions as a way to communicate over the network from client to server using TCP/IP protocols.
Live Servers
As going by the name, live servers look for any change in your live code and instantaneously change the preview of your code. With the help of JavaScript, it tracks the state of the page and if there is any change it will report to the browser and the preview of the same will be changed.
Live server by Ritwick Dey works on the same concept. Static files located on our computers like HTML, CSS, and JS don't need a server to be opened by your browser. What this extension does is it just reloads our browser when it detect changes in our static files. This extension is available on different code editors.
HTML
HTML is a markup language. It is the skeleton of your web page. It contains different tags or elements which help us to build the structure. We'll be discussing some of the elements.
<h1>
<h1> tag is used to give heading. It shows the font in bold and larger size giving it a "heading" look.
<h2>
<h2> tag is same as the <h1> tag. The only difference between them is size. Fonts in <h1> element are larger in size than that of <h2>.
<p>
The <p> HTML element represents a paragraph. When you are writing an article that has more than one paragraph, then you use <p> element. They are block-level elements, which means they take whole line and any other content will be placed in the next line.
Lorem Ipsum
It's not a tag. They are text which is used as filler. When you are designing a web page, you may or may not have the proper content given to you to put inside the page. So to fill up the words we use "Lorem Ipsum". It will give you a rough idea of how your web page will look with that many words. It's written in Latin but it does not make any sense.
<a>
<a> element is used to create hyperlinks to web pages, files, email addresses, locations in the same page, or anything else a URL can address. To use <a> element, you need to provide a value to its "href" attribute. Some of its attribute are:
href: You provide the URL as a value that the <a> tag points to.
download: Causes the browser to treat the linked URL as a download.
target: Specifies where to open the linked document. "_blank", "_parent", "_self" and "_top" are the accepted values.
<img>
If you want images in your web page, we use <img> tag. It embeds an image into the document. "src" attribute is required attribute. It provides the path to the image you want to embed. Some commonly supported formats of images are: "APNG", "AVIF", "GIF", "JPEG", "PNG", "SVG" and "WebP". You can really play with the <img> tag with the help of its attributes. Let's discuss them.
alt: Gives an alternate description of the image. Sometimes due to network or some other issue, image may not load on the web page. alt attribute will give you a rough idea about the image or what the image is about.
decoding: Gives the browser hint on how to decode the image. Accepted values are "sync" which will decode the image synchronously, "async" which will decode the image asynchronously, and "auto" for no preference mode. The browser decides what's best.
fetchpriority: If you have more than one image embedded in your document, fetchpriority attribute will give the browser hint on which image to prioritize when fetching the image. Accepted values are "high", "low", and "auto".
height: This attribute allows you to decide the height of the image in pixels. You do not need to provide width attribute value as it will maintain its aspect ratio according to the height value. Must be an integer value.
sizes: You can specify different sizes of images for different page layouts. Each source size consists of a median condition and a source size value. For example: (max-height: 500px) 1000px tells the browser to use 1000px as width if the viewport is not higher than 500px.
srcset: It allows you to use different types of images for different situations. It has one or more strings as value separated by comma. Each string is composed of the image source URL and width descriptor w or pixel density descriptor x. If no descriptor is specified, the source is assigned the default descriptor of 1x. You can not use both descriptors in the same srcset. If the srcset attribute uses width descriptors, the sizes attribute must also be present, or the srcset itself will be ignored. Example of srcset srcset="image-200px.png 200w, image-400px.png 400w" sizes="(max-width: 600px) 200px, 50vw". Notice of we used sizes too since we use width descriptor.
loading: Let the browser know how to load the image. Accepted values are "eager" which loads the image immediately and "lazy" which loads the image when a certain point in viewport is reached.
ismap: This is a boolean attribute that let us work on certain points on the image.
usemap: The partial URL (starting with #) of an image map associated with the element.
Use 0.5x for better view


